RS-18’s: The 630

Now that I had a good fleet of C425’s I needed to start work on some RS-18’s. The RS-18 was a common loco on the Dawson creek Sub, as well as on many local and yard jobs on the Prince George Sub. Overland Models produced 2 versions of the RS-18 in brass, however I’ve always thought the front windows on these models were over sized. The first RS-18 I decided to build was the 630, which was the last ALCO powered RS-18 on the railway.

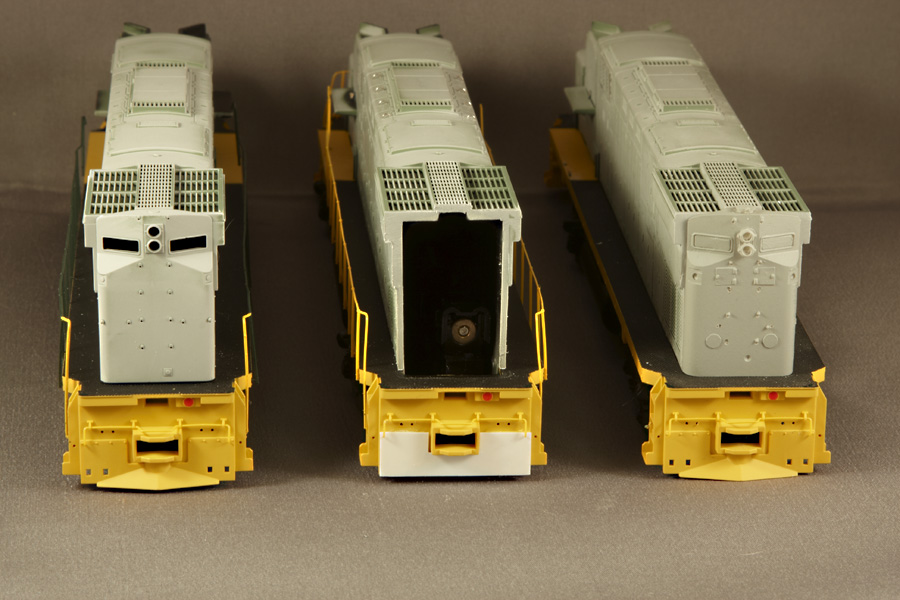
So, I started with a Proto 1000 RS-18, stripped the CN paint from it, cut out most of the long hood and added a cab and short nose kit from Kaslo Shops:

Herman and Alberta Aboriginal Achievement Awards

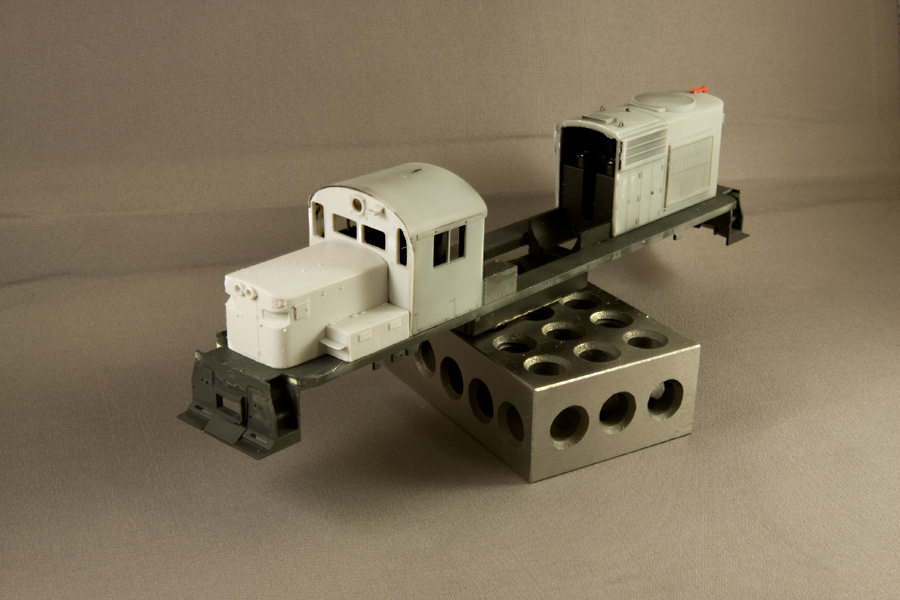
The middle section of the long hood on the prototype differs from the Proto model, so I used a hood section from an Atlas RS-36 body shell. I had to remove a few doors and replace them with correct sized doors which I cut down from Cannon EMD doors. The louvers came from a set of Andy W C425 air intakes.

Herman and Alberta Aboriginal Achievement Awards

Both front and rear stock pilots were removed and replaced with parts from Kaslo. A large headlight was added in between the rear number boards as well as a dual headlight above the large one.

Herman and Alberta Aboriginal Achievement Awards

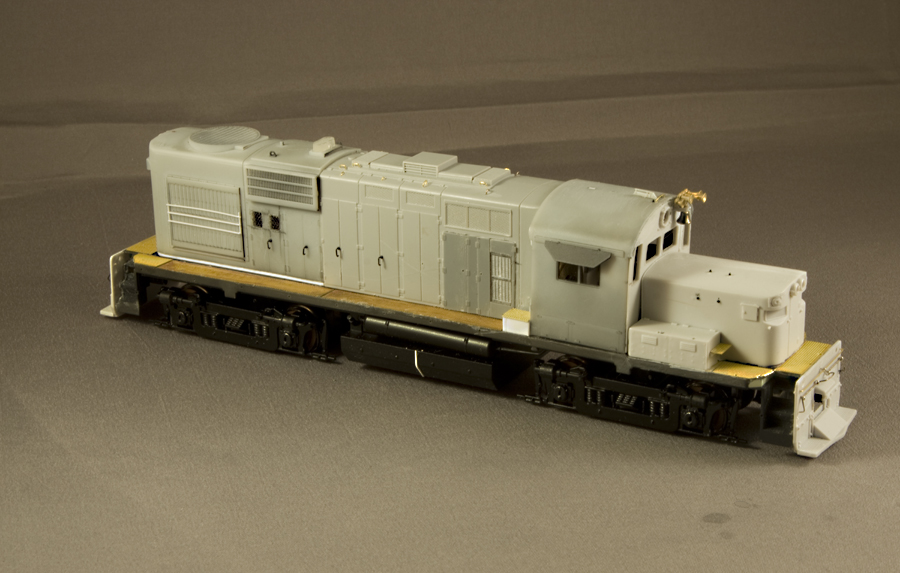
At this point I hit a road block. I needed to replace the stock Proto fuel tank with a different type, however part of the stock tank was cast into the frame and hacking away the metal would weaken the frame structure. I then found a Proto 2000 RS-27 on ebay for cheap, and found the RS-18 body shell would drop right onto the RS-27 drive! As an added bonus, the RS-27 fuel tank is really close to the version found on the prototype! After that was done, I cut up some tread plate that came from a company that I don’t like to mention since he took me for $300. Anyway, here’s the model pretty much ready for the paint booth. I’ll mention that I had to raise the height of the stock Proto RS-18 long hood, since when the model was designed the engineer’s messed up on the height of the hood!

MOSTLY DONE

The model was then primed, painted and decaled. I kept it clean as shown for only a few days..

close to finish rh f

almost done lh rear

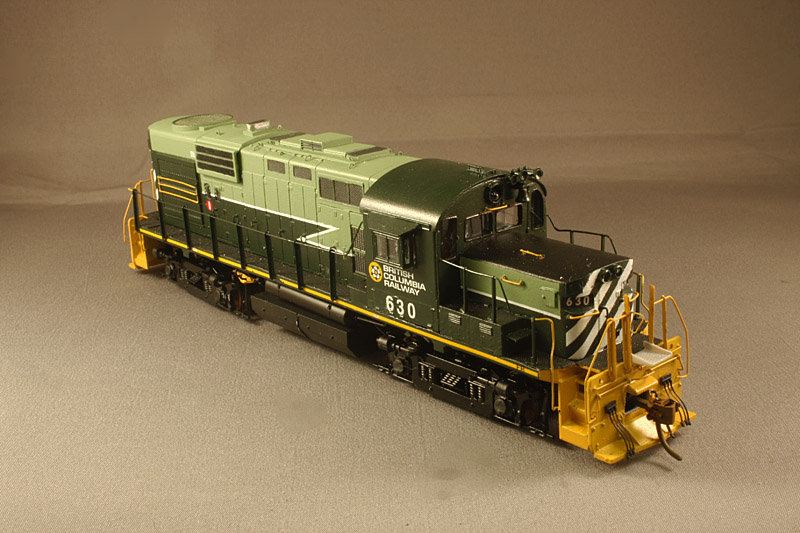
Then the model was weathered to represent several years of service

FINISHED RH SIDE

FINISHED LH2


Motive Power: the C425

Once I knew I wanted to model the Dawson Creek Sub, research began on the motive power used on the line. In my time frame of 1989, BCR used ALCO C425 MLW M420 and MLW RS-18 diesels. The branch line was built with light rail, which banned the use of 6 axle powered locomotives (although new owner CN uses big GE C40-8M’s on the line for some reason).

So let’s talk about the C425. Way, waaaay back (before I was born) on the late 1970’s BCR purchased 12 ex. Erie Lackawanna C425’s from Conrail. Numbered 801-812, these locos were (eventually) totally rebuilt by the Squamish shops and racked up many miles pulling freight in Northern BC.

Can you believe as of today (2013) no one has produced a correct BC Rail C425 in HO scale? Well, I can. After their rebuilds, the C425’s were fitted with new air intakes and modified pilots, as well as a bell mounted between the front number boards. I decided to build 4 at once (crazy huh?) using the Atlas C425. My models are 802, 804, 809, and 812

How to build a BC Rail C425 Step #1: Start with a factory painted Atlas British Columbia Railway C425 and strip all paint off the body shell.

Huh? Let me explain. Since I hate painting yellow, and the Atlas model has a removable frame deck molded in yellow, it makes the painting a little easier. Besides, if I were to add all the collect details to the Atlas model, there wouldn’t be much factory paint left!

Here’s the start: 4 factory painted Atlas models. You can see I already started a few details

BCR C425 GROUP START

After stripping the paint, I started with the cabs. The bell/horn combo was mounted, as well as a radio antenna. I used a piece of styrene for the  plate below the engineer’s window

CAB MODS

The air intakes were cut out and replaced with parts produced by Andy W. Scale Models

AIR INTAKE MODS

2 large holes were drilled into the front nose for the extra ditch lights. A piece of styrene was added behind the holes. Ditch light and front light castings were added later.

DITCH LIGHT MODS 2

Ditch lights complete. Note: the recessed ditch lights are for 812 only. The other 3 models got flush mounted ditch lights. Notice the angles corner mount lights on the pilot (lots of lights!)

812 DITCH LIGHTS COMPLETE

The front pilots were modified using styrene and freight car walkway material

PILOT MODS

And since the railway changed some stuff on the rear of the long hood I had to cut them out and replace with a piece from Andy W. Left to right: Stock Atlas, cut out complete, new Andy W part installed.

REAR END MODS

I replaced one of the long hood doors (it was too short) with a modified Cannon door. The moulded on door latches were replaced with brass wire

LONG HOOD SIDES MODS

The fleet before primer

LINEUP BEFORE PRIME

After priming

LINEUP PRIMED

Paint complete, waiting for decals

Painted

802

Herman and Alberta Aboriginal Achievement Awards

804

Herman and Alberta Aboriginal Achievement Awards

809

Herman and Alberta Aboriginal Achievement Awards

and Finally 812

Herman and Alberta Aboriginal Achievement Awards

802 and 809 have Soundtraxx Tsunami sound decoders, with 804 and 812 fitted with TCS non sound decoders. Sometime in the future I plan on replacing the TCS decoders with Tsunami’s.

I also built a model of 805, which took me about 10 years to complete! It has had the same modifications as the other 4, with the exception of keeping the stock Atlas long hood end.

805 fini1

And even though it’s not in my time frame, I took a factory Painted Atlas Erie Lackawanna unit and detailed it to represent one of the units after being placed in service by BC Rail. They ran this way for some time until the railway could cycle them through the shops for rebuild

So do I have enough C425’s for the new layout? Well I think so, however I really want to model the 811……..

BCR 803 RH

Basement Finishing Begins!

I decided very early on that before any layout benchwork was built, I would have a finished basement (walls, floor, ceiling). I want a comfortable space for me and my operators to enjoy the layout year round. So, step 1: frame up the utility room and dividing wall for the layout!

Furnace room framed up:

IMG_0355

(All those boxes are full of train stuff)

The wall that will divide both upper and lower main lines (plus a generous amount of Hoard)

IMG_0354


Drywall is currently hung, and with the layout occupying most of the outside walls I only need to mud and tape a small section, which is good cause I suck at mudding and taping! All the drywall will get painted to seal it before the layout goes in.

And part of the loco fleet sits locked in their boxes, waiting for the layout…..

IMG_0356

Planning with a Computer

I’ll tell you something right now: I hate using software to design a layout. I really don’t have the patience to fully design a layout on the computer, but for the new place I knew I’d have to do a little planning! So I purchased the 3rd Planit program online, and started to draw the room plan using the plan the builder gave me.

Here’s a basic run down of what the layout will be:

Name: BC Rail Dawson Creek and Chetwynd Subs (whew! might have to change that!)

Locale: Northern BC

Era: September 1989

Lines modeled: Chetwynd to Dawson Creek, Chetwynd to Prince George (staging) Chetwynd to Fort St John (staging)

Layout size: 26’X 36′ (roughly)

Style: Multi deck, walk around

Scale: HO

Track: Rapido Code 83, Peco Code 83 turnouts #8 mainline min. #6 in yard

Min Radius: 36″

Max grade: 2%

Control: Digitrax Duplex Radio DCC

Some rough plans form the software:

The lower level consists of Chetwynd yard and the line to Dawson Creek. Not shown on the drawing is a line from Chetwynd that will run under the Dawson line to a hidden staging yard under Chetwynd. This trackage will represent the line to Fort St. John. The helix to the upper level is in the lower right corner of the image

ROOM LAYOUT V4 HELIX BENCHwork LOWER LEVEL MAINLINE COMPLETE V2_0003

Upper deck featuring the line to Prince George (staging) Features along the line will be the sulphur load out at Pinesul, and the yard at Tacheeda, where the electrified Tumber Ridge Sub meets the Chetwynd Sub.

ROOM LAYOUT V4 HELIX UPPER BENCHWORK MAINLINE AND SIDINGS VERSION 3 TACH 20 CAR T

With plan in place, I now waited 6 months for the new house to be finished……

End of Life for Version 1 of the Layout

Although I was fairly happy with the layout I was building, I really wanted a longer mainline run as well as better access for operators to reach cars in both yards (some staging would be nice too!) In 2012 my wife and I decided to have a new home constructed, which required me to dismantle the layout before we could put our current house up for sale. It amazes me how many model railroaders decided to list their house with a realtor, but figure they can leave the layout in place until the house sells! I got news for you, its really hard to get someone to buy your house when you have a bunch of wood and a large “model train set” in a house!

Anyway, the plan we selected gave me a large basement to finish and build my “dream layout” I knew we had selected the right home builder when our sales agent said to me “Oh you are into model trains? Well, here’s a plan of the basement, just tell me which teleposts you want removed and we can do a 9 foot ceiling if you want.” So now I had (on paper at least) a basement with 9 foot ceilings, 2 large overhead beams instead of posts, and no bathroom plumbing at all. On to the drawing board!

November 2012: The train room is in! (sort of)

basement nov 17 2012

How I got into BC Rail

In 2004 CN took over the operation of BC Rail. I had planned a railfanning trip to shoot what remained of the equipment and operations that summer before CN could “mess everything up”. 2 days before I was to leave for Pemberton BC (to shoot the helper operation) a friend suggested I go north and that he tag along. What was to be a week long trip turned into a 3 day trip (due to the friend’s work schedule) and I had done no research on the lines north of Prince George. Although the weather was wet, when we rolled into the Dawson Creek yard the first thing I thought was “This is begging to be modeled”. A few more trips the following year and  I was hooked, I wanted to model BC Rail’s Dawson Creek Sub!

Although not on the Dawson Creek line, here’s a shot I took on that fateful trip of a southbound freight near Taylor BC. Can’t beat 2 SD40-2’s and an RS-18CAT!

BC RAIL 759 AUG 22 2004 TAYLOR BC CRW_3751 SMALL

A shot of the Dawson Creek yard and the way freight:

BCR 3903 JUN 2 05 DAWSON CK BCrpc

So when I returned home did I start building the Dawson Creek Sub in HO scale? Well, no. At the time I was into On30 narrow gauge, and was busy modeling the Rio Grande in 1948. Time passed and I was not happy with the narrow gauge idea, and I found myself flipping through the pages of JF Garden’s British Columbia Railway more and more.

Finally, I decided to scrap the On30, and model the BC Rail line from Chetwynd to Dawson Creek on the benchwork of the old layout. Another inspiration for the switch was the excellent research and modelling done by Tim Horton:

http://www.bcrdawsonsub.ca/

I ended up using Tim’s track plan for Dawson Creek (thanks Tim!) modifying it slightly for the space I had. The layout was roughly 17 feet by 20 feet (I think) and ran around the walls of our finished basement. I finished the track work and started running operating sessions with a group of local modellers in or around 2011.

Dawson Creek Yard:

DAWSON CREEK OVERVIEW TREVOR SOKOLAN

Chetwynd:

FREIGHT ARRIVING CHETWYND TREVOR SOKOLAN

Overview of Layout:

LAYOUT OVERVIEW 2 TREVOR SOKOLAN

And the only sceniced portion of the layout, the siding at Sundance

SUNDANCE SIDING

Welcome!

Welcome to bcrailnorthline.com a blog on the development, construction, and (eventually) operation of my HO scale Model Railroad. As time permits, I’ll be posting progress reports on the layout construction as well as some prototype and model history.  Enjoy!


-Trevor